TABLE OF CONTENTS
What is time reporting and why to use it?
What settings to consider (Toolbox, Server > Bookings...)
Time Report Mode and Edit Project window
Time reported More Than Booked
Time Reporting in the Web, MWC and iOS
Differences between Booking vs Ad-hoc Time Report
Personnel Tree > View Mode > Timereport
What is time reporting and why to use it?
Time Reporting enables tracking the differences between the BOOKED, actual USED and (To) INVOICED time and easily spot where's work done and ready to invoice. It's also a way to indicate that a job / booking is finished.
What settings to consider?
Various Settings in toolbox and server setup can be configured depending on the workflow.
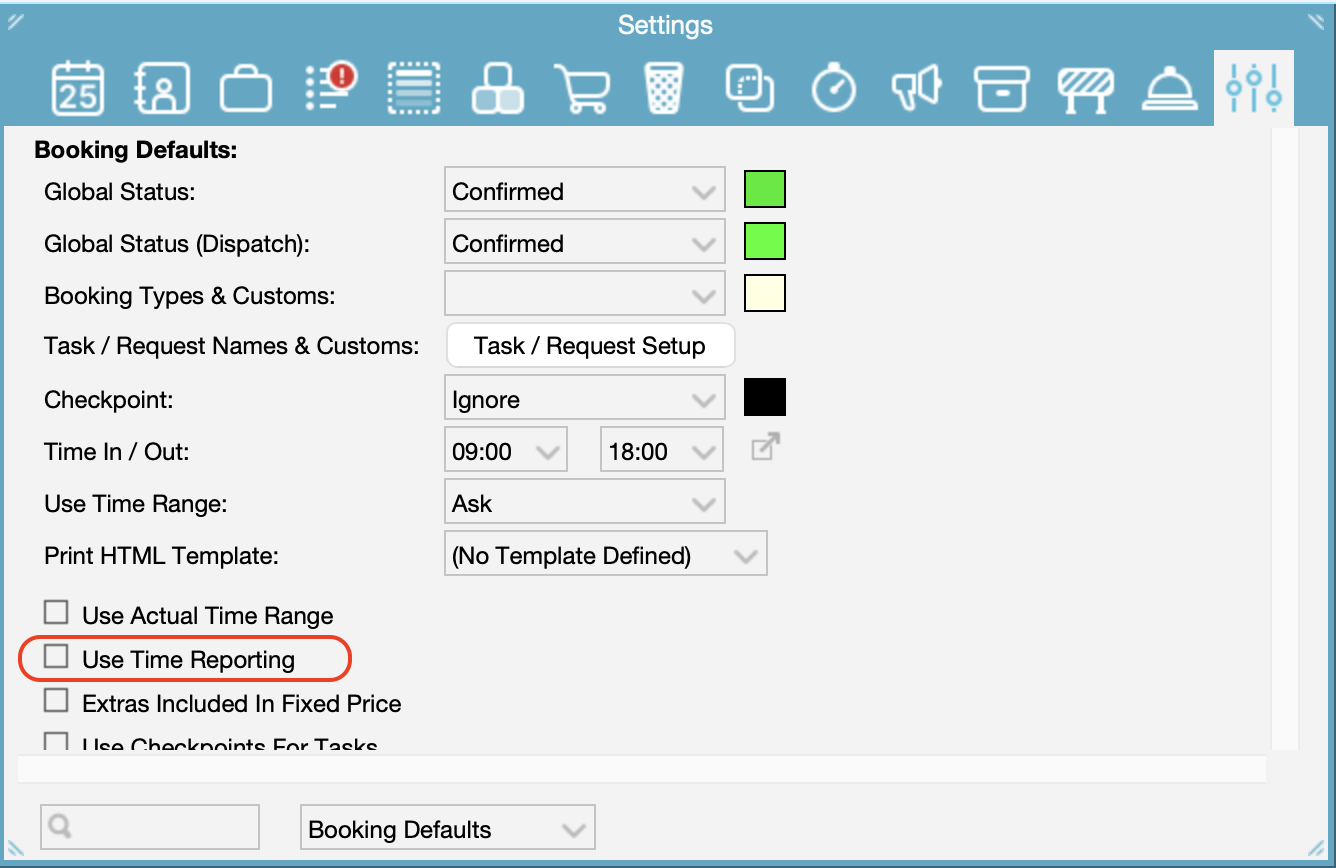
Toolbox > Settings > Booking Defaults > Use Time Reporting
Time Reporting is enabled per User. So if User A has it enabled, all bookings she creates will have time reporting enabled. Whereas if it's disabled the bookings will not have time reporting enabled. Time reports can be individually enabled or disabled on a per booking basis later on.
If a booking has Time Report enabled, the Time Report icon (little clock, changing colors depending on the status of the Time Report) appears on the Bookings and gives an easy access to the Time Report window and a quick overview whether a Bookings has been time reported or not.
Server Settings:
In the Server Setup > Bookings tab we can configure the following settings/options:
Allow Forced Invoice Time In Timereport
If set to Yes this option will enable a third column on the Timereport window, called To Invoice, which will allow Advanced Users to fill in the amount of hours to be invoiced, overruling the amount of Booked hours as well as the amount of Timereported hours. If set to No, the Invoice Creator will use the information from the Used column.
Auto Fill-in Invoiced Time From Used Time
If set to Yes, the third column in the Timereport will be auto-filled in with the reported Used time.
Timereport By Actual Time
Select Yes to Timereport by the actual start and end time that it took to complete the job. If set to No the system will only allow the option to report the total amount of hours that it took to complete the job.
Show Set Times As Booked Button In The Timereport Window Set to Yes to get the Set All Times As Booked button at the bottom of the Timereport window. By clicking this button, the Used and To Invoice will be filled in with the Booking times.
Warning When Timereport Not Confirmed Booking
If the Booking Status is other than Confirmed and a User tries to Timereport it, a message will warn the User about the status, but will allow continuing.
User permissions
There's a difference between Advanced vs Web Users for time reporting permissions.
Necessary Permissions for Web Users to be able to time report and create ad-hoc Time Reports:

Since v7 you can also choose the default Booking Status for ad-hoc Timereports. This can be useful in specific reports related workflows where you'd like to exclude ad-hoc time reports from some reporting.
Access the Time Report - Advanced Users
The Time Report can be accessed through the Time Report icon on the Booking in the Hourline or from within the Booking Edit Window, from the Booking inside of the Project, the Long Form if the corresponding setting is activated (Toolbox > Settings > Projects Tree > Timereport) or via the To do tab in the Toolbox.
Time Report window
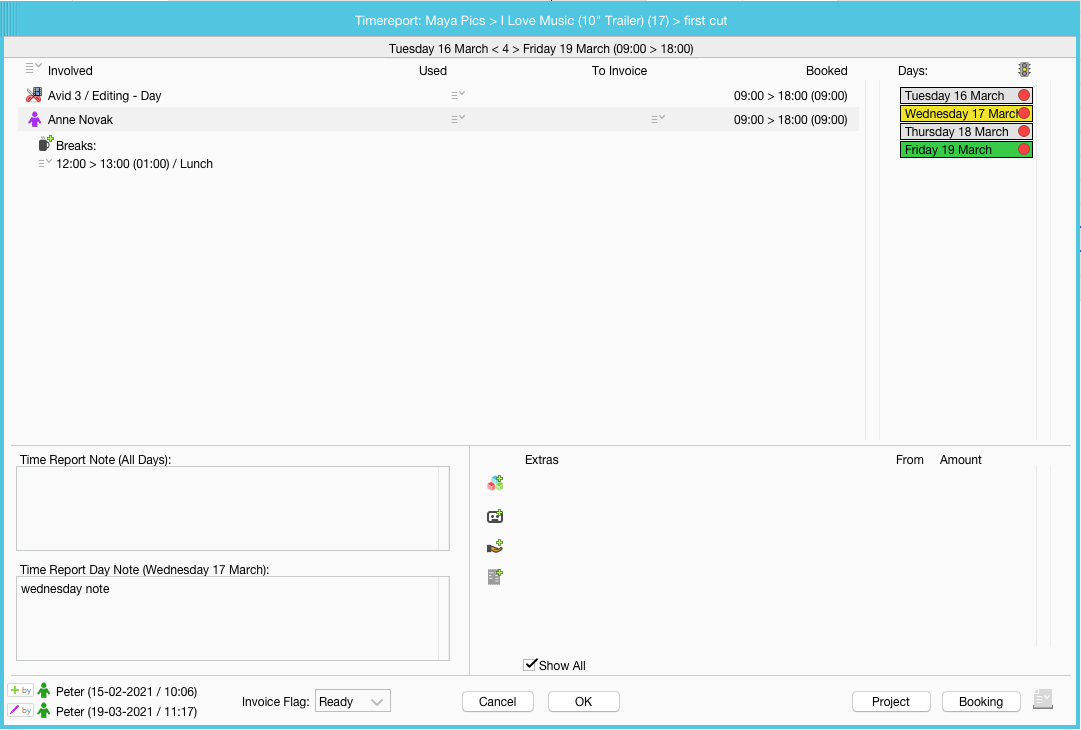
- Involved: In the dropdown menu of Involved select the start and end time of all Objects involved on that day. Other options are: Clear Day, Time Selector, Set Time As Booked (if the amount of used hours is the same as the booked hours). The same settings can be chosen to apply the changes to All Days.
- Used: Press the dropdown arrow below Used to set time the amount of hours used individually.
- To Invoice: This option, if enabled in the Server Setup, allows to set the hours to be invoiced for each individual person or Object and it will be reflected in the Project View as well as in the invoice. If used, this option has the highest hierarchy of the three.
- Booked: Displays the original booked hours of the Objects.
- Breaks: Select this option to time report any breaks. Breaks will be automatically deducted from the time reported hours.
- Days: Lists the days of the Booking to easily jump from one day to another and indicates whether the Booking on that day has been time reported (green clock) or not (red clock).
- Time Report Note (All Days): In this area you can fill in any notes related to the entire Time Report.
- Time Report Day Note: If the Booking is a multiple day Booking this field allows to leave a note per day. The Note can only be accessed through the Web/iOS of past/current Bookings > Time Report.


- Extras: Add Extras like Materials, Services, Expenses as well as Objects (yellow star) to the Time Report. Extras can be modified by clicking on the drop down arrow next to Amount.
- Edit: Edit the Note.
- Amount: Edit the Amount.
- Date: Edit the Date.
- Remove: Remove the Extra.
- Outgoing Purchase Order: Add an Outgoing Purchase Order if there exists one.
- Invoice Flag: Set the Invoice Flag to Ready, On Hold or Ignore.
Time Report Mode and Edit Project window
Via the Project and Booking button is is possible to quickly access the Project and the Booking from within the Time Report window.
Time report Status:
- RED = Not time reported
- GREEN (all days) = Time reported
- YELLOW = Project is closed
- WHITE = Booking has been invoiced.
The Time Report mode is by default set to "To Invoice / Used / Booked" meaning in the Edit Project window the user always sees the "to date" numbers. The Time Report Mode can be changed temporarily to e.g. see all what was USED so far.
Time reported More Than Booked
This settings allows to see in the Hourline, Project Tree and Project window, if the booking was time reported more than booked.
If "Time reported more than booked" is enabled in the Toolbox Settings > Hourline or Project Tree, it will indicate which bookings were reported over booked time. You will see red exclamation mark on top of the green dot.
When you hoover mouse over the icon, you will also see the detailed information on booked and used time.

Time Reporting in the Web, MWC and iOS
Please read/share these articles on how to time report in web client/iOS/MWC
https://support.farmerswife.com/support/solutions/articles/17000061744-time-reporting-in-ios
Ad-hoc Time Reports
An Ad-Hoc Time Report is a Booking that is not considered to be booked in advance. Typically, this occurs when the day is interrupted by some unforeseen, urgent work.
The reason for differentiating between “Ad-Hoc” and normal Bookings is to get accurate financial reporting. If a normal Booking is booked from 09:00 - 11:00 and time reported the same, then the Financial Report will show “Booked: 2 hours” and “Used: 2 hours”.
But on the same Ad-Hoc Booking, it will show “Booked: 0 hours” and “Used: 2 hours”. This is an important detail for example when trying to improve estimates by learning from past projects.

In the Hourline you can create an Ad-hoc Time Report in the 'Used/Booked' and "Used" View Mode.
Click and drag through the hours you worked on this "unplanned" project and a pop up window will appear with the "Ad-hoc time report" option.

In the Web Client click either on the "Ad-hoc time report" button placed on the top left of the page or on the plus symbol on the bottom and fill up all the information required or drag&drop down the ad-hoc time.

In the iOS app click the + and choose: Ad-hoc Timereport. Select a Project. Choose time in/out. The "booked" time shows as 06:00-06:00 (or 00:00 - 00:00 depending on start of the day configuration.)
 |  |  |
Editing Ad-hoc Time Reports
You cannot edit ad-hoc time reports in the schedule view (not by drag&drop, nor double click > Edit). Because when you look at your schedule you primarily see what it Booked. Ad-hoc does not have (saved) booked time. This is why you can’t edit it directly. When you open the Ad-hoc you will see N/A in booked time.
In order to change the time you need to go into the Time Reports > Recent > open the Time Report > Edit > change the time.

Differences between Booking vs Ad-hoc Time Report
- Bookings have to be time reported, if time report is enabled, this is useful for planned work.
- Ad-hoc time reports are created in the past to track work that has been done but there was no booking for it.
- Visibility of Ad-hoc Time Reports:
- It's not possible to see Ad-hoc time reports in the Long Form (Object Tree) > Long Form is only showing Booked time. If Ad-Hocs were showed in the LF, it would let the users perform operations on them that could lead to an inconsistent database.
- To visually see Ad-hoc time reports in Long Form go to: Personnel Tree > View mode > Time report > see who time reported, who did not.
- When you move an Ad-hoc time report to another day it will reset the reported time to 06:00-06:00 and you can no longer see the booking clearly in the Hourline.
- When creating Ad-hoc time report you can not choose a binder. When you create a booking you can choose/create binder.
- Ad-hoc time report have N/A in BOOKED time. It gives you the accurate used vs booked numbers: ad hoc time report is something that was never booked before.
- Ad-hoc time reports don’t cause conflict with other bookings.
- Permission profile > you might not want to allow users to book, but it’s ok if they time report.
Notifications
On ad-hoc timereport creation on projects
You can configure a notification for users when an Ad-Hoc Timereport is created on the Project.
See the article on Global Notifications.
Email notification on bookings where Users report overtime
We can Send Email Notification to specific Users with a summary of all users that have reported overtime on a day.
The system will send one email at a specified time of the day to be configured in the Toolbox > Settings > Web Shared Settings.
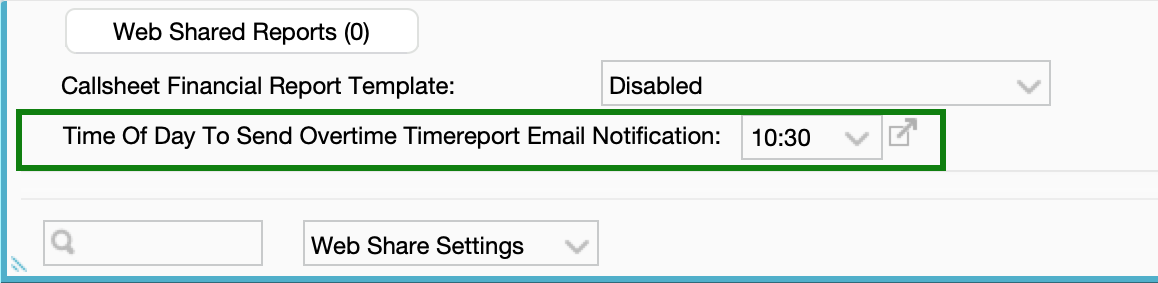
The email will contain time report information of the previous day.
Enable the Web Permission in the Web Profile Manager > Timereports > Allow Editing Timereports:
Send Email Notification When Reporting Overtime
so if the User reports Overtime the bookings are included in the email report.
Enabled the Advanced User Permission:
Receive Email Notification On Users Reporting Overtime
for those Users who should receive the email.

The email contains:
user - date - booked time and reported time - project name - *binder name* - booking name

Personnel Tree > View Mode > Timereport
For Managers they can overview the time report status of the users' bookings

Was this article helpful?
That’s Great!
Thank you for your feedback
Sorry! We couldn't be helpful
Thank you for your feedback
Feedback sent
We appreciate your effort and will try to fix the article